Behind the shot - Mathias Joschika

Mathias Joschika

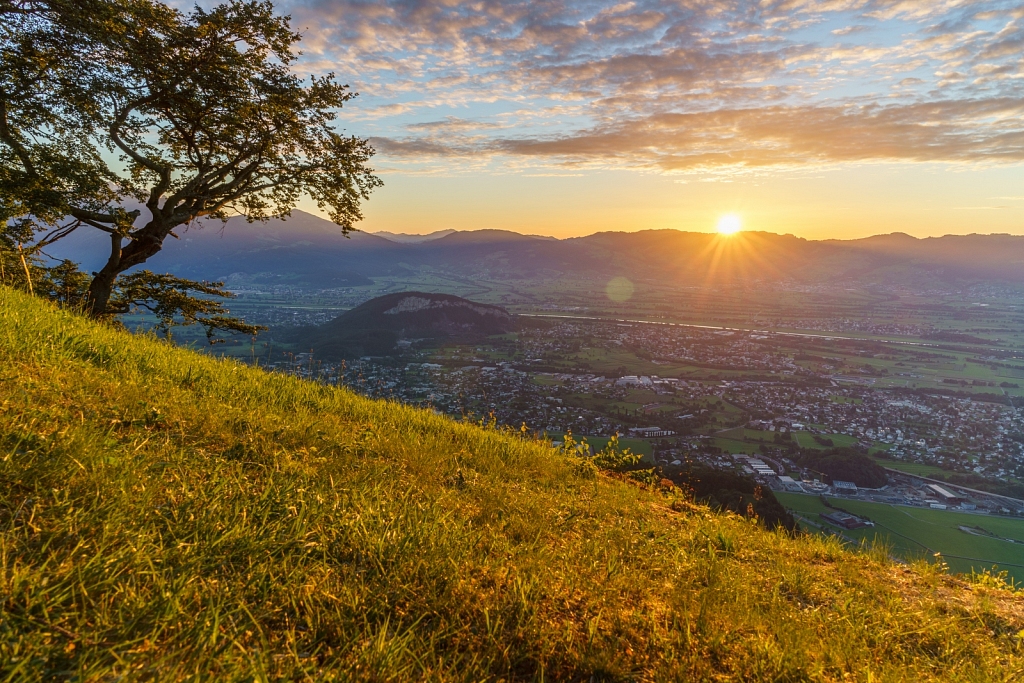
Behind the shot: Sunset

In this series I try to show you how I took some of my pictures in my portfolio. You will get to know the gear and settings I used, as well as a little back story of how and why the image was created.

Enough introduction - let's get it on!

Sunset
Gear
Settings
Body: Sony a7ii

Shutter Speed: 1/30
Lens: Sony 28mm 2.0

Aperture: 11
Flash: None
Focal Length: 28mm
Filter: 3 Stop Soft GND

ISO:
100

Spontaneous sessions sometimes really pay of.

This spot is super accessible and is also easy to squeeze in between other appointments your daily life throws at you. After coming home from a multi day work assignment, I decided to head up there and enjoy the sunset.

Even though I used a 3 Stop GND, I still had to do a bracketed shot, because the dynamic range of the scene was way to big. I wanted to get as much detail as possible in the clouds as well as in the valley. What use is a nice sunset with a lot of black underneath it?
For everyone interested: I combined the shots using Lightrooms HDR Merge module.

Some of you might ask: Why did you use a 3 Stop GND and not a darker one? That is an easy answer: I only own one GND. Even if I had a darker one, I probably still would have struggled with the foreground and the valley.


Behind the shot: Lonely

In this series I try to show you how I took some of my pictures in my portfolio. You will get to know the gear and settings I used, as well as a little back story of how and why the image was created.

Enough introduction - let's get it on!

Lonely
Gear
Settings
Body: Sony a7ii

Shutter Speed: 1/500
Lens: Sony 28-70mm F3.5-5.6

Aperture: 6.3
Flash: None
Focal Length: 70mm
Filter: None
ISO:
200

Sometimes you just have to be lucky and keep your eyes open.

After taking the shot "Foggy" I was heading back down. Quite some walking later I got back into the super thick fog and started to look for some interesting motives in the forest. I found a couple of promising scenes and tried to work out a composition which I liked.

The photos I took in the forest just did not work out the way I would have liked, so I went on to get back to the car. About ten minutes before I was back at the parking lot, I saw this lonely, crooked looking tree. Thanks to the thick fog, the light was diffused and especially the backlight of the tree was just marvellous.

Since I had my settings already at ISO 200 from the shots in the forest, I just left them there and took a test shot. I imagined a calm tree in my images, so I had to use a faster shutter speed because the branches of the tree were shaking due to the wind. I zoomed in and pressed the shutter. Nice!

When I imported the picture in Lightroom I saw some huuuuuge sensor dust spots. While changing lenses on the mountain top, some rather big particles took the opportunity and settled on my precious sensor. Fortunately, it was relatively easy to remove these spots in this image. After one click onto black and white and some contrast and clarity sliding: Tada - there was my envisioned image.

Behind the shot: Foggy

In this series I try to show you how I took some of my pictures in my portfolio. You will get to know the gear and settings I used, as well as a little back story of how and why the image was created.

Enough introduction - let's get it on!

Foggy
Gear
Settings
Body: Sony a7ii

Shutter Speed: 1/125
Lens: Sony 75-300 4.5-5.6 + LA-EA3

Aperture: 20
Flash: None
Focal Length: 160mm
Filter: None
ISO:
100

Scenes like this are the reason why I love landscape photography.

After days of sitting in the fog I finally found the time go get out and up the mountains. I hoped for an image like this so I packed my only telephoto lens I have - a cheap Sony SAL 75-300 4.5-5.6 with an LA-EA3 adapter.

When I arrived at the top I was greeted with a view you would call: WHITE! Oh how I loved the fog in that moment... Hiking up and getting exactly the view you DO NOT want.

But I was lucky. The fog and the view were exchanging their place every minute.
Just for your imagination: I couldn't create a panorama because after one or two images I had to wait for the fog to dissolve again. And even then, the exposure changed dramatically.

So I set up my tripod and pointed my camera roughly in the direction where I knew the valley would be. That is definitely not so easy when all you see is white! After a couple minutes the fog cleared enough for me to frame the shot and get my composition right.

I shot a couple of images in rapid succession because I wasn't sure if the fog would clear again. Unfortunately, my fears were right and I left back home again.

Nonetheless I got the shot I wanted and it is currently sitting as a 60x40cm print in its black frame.

Behind the shot: Cosmea

In this series I try to show you how I took some of my pictures in my portfolio. You will get to know the gear and settings I used, as well as a little back story of how and why the image was created.

Enough introduction - let's start with one of the oldest shots in my portfolio.

Cosmea
Gear
Settings
Body: Sony a6000
Shutter Speed: 1/350
Lens: Minolta MD 50mm 1.7
Aperture: 1.7
Flash: None
Focal Length: 50mm
Filter: None
ISO:
100

I quite like this image, because it has a really strong contrast between the petals and the background. This contrast is boosted by the (slightly nervous) bokeh of my almost 40 year old Minolta lens.
The flower was standing right in front of a concert venue and I actually brought my camera for the concert, not for the flowers.
While waiting for my friends to arrive I decided to test the close focusing distance of my lens (since I had not used it that much up to that point). It was also a test for my handholding and focusing skills because the sun was already set and it started to get dark outside.

Oh - for all of you wondering: The concert was great.